
While a VPS isn’t necessarily part of your Homelab, it can be a useful tool to manage and monitor your home lab. Whether we like to admit it or not, residential internet doesn’t have the uptime and reliability of that of commercial datacenters. I figured to give 1 month a try and set up Uptime-Kuma with a Traefik reverse proxy. This also gave me the opportunity to learn Traefik since on my home network I use HAProxy as my reverse proxy.
VPS
VPS, or virtual private server, is a cloud hosted, virtualized, server which you can purchase for typically some form of time increment. The pricing varies based on the specs of the server. For my VPS I went with a 1 vCPU and 1GB ram one from https://buyvm.net. It has generally been okay Check my note about them below, but in my experience has some issues with SSH disconnecting randomly. For my operating system I chose Debian 11.
Once you are assigned your VPS you typically get a dedicated IP address and are giving the root login credentials. It’s probably best to change the root password once you log in for the first time by running passwd.
Once in, I used this simple script to update the system and install docker, zsh, and oh-my-zsh to manage zsh.
1
apt update && apt upgrade -y && apt install curl zsh git -y && sh -c "$(curl -fsSL https://get.docker.com)" && sh -c "$(curl -fsSL https://raw.github.com/ohmyzsh/ohmyzsh/master/tools/install.sh)" -y
Traefik
Traefik is a edge-router and reverse proxy to make it easy to publish your services to the web. One of it’s main benefits is how easily it integrates into Kubernetes, Docker, AWS, etc. A striped down example of my docker-compose.yml and required config files for Traefik can be found here.
It’s as easy as running docker compose up -d to get Traefik basics up and running. Then to add services to Traefik it’s as easy as adding a handful of labels to your services docker-compose.yml.
Uptime-Kuma
Uptime-Kuma, as I talked about in my first #100DaysOfHomeLab post, is a self-hosted monitoring tool. The instance I run in my homelab works great, however, if the internet in my homelab were to ever go down, it wouldn’t be able to notify me. Having a second instance hosted on a VPS outside my network allows for me to easily have some redundancy in my monitoring tools.
I did have to make a few changes to my original docker-compose.yml for Uptime-Kuma which was to add the Traefik labels, add it to the proxy docker network, and delete the expsoed port:
1
2
3
4
5
6
7
8
9
10
11
12
13
14
15
16
17
18
19
20
21
22
23
24
25
26
27
28
29
version: "3.8"
services:
  kuma:
    container_name: uptime-kuma
    image: louislam/uptime-kuma:latest
    security_opt:
      - no-new-privileges:true
    restart: always
    volumes:
      - /etc/localtime:/etc/localtime:ro
      - ./data:/app/data
    networks:
      - proxy
    labels:
      - "traefik.enable=true"
      - "traefik.http.routers.uptime-kuma.entrypoints=http"
      - "traefik.http.routers.uptime-kuma.rule=Host(`status.example.com`)"
      - "traefik.http.middlewares.uptime-kuma-https-redirect.redirectscheme.scheme=https"
      - "traefik.http.middlewares.sslheader.headers.customrequestheaders.X-Forwarded-Proto=https"
      - "traefik.http.routers.uptime-kuma.middlewares=uptime-kuma-https-redirect"
      - "traefik.http.routers.uptime-kuma-secure.entrypoints=https"
      - "traefik.http.routers.uptime-kuma-secure.rule=Host(`status.example.com`)"
      - "traefik.http.routers.uptime-kuma-secure.tls=true"
      - "traefik.http.routers.uptime-kuma-secure.service=uptime-kuma"
      - "traefik.http.services.uptime-kuma.loadBalancer.server.port=3001"
      - "traefik.docker.network=proxy"
networks:
  proxy:
    external: true
Then it is as easy as running docker compose up -d and once started it will launch Uptime-Kuma and Traefik will automatically set up the proxy for it.
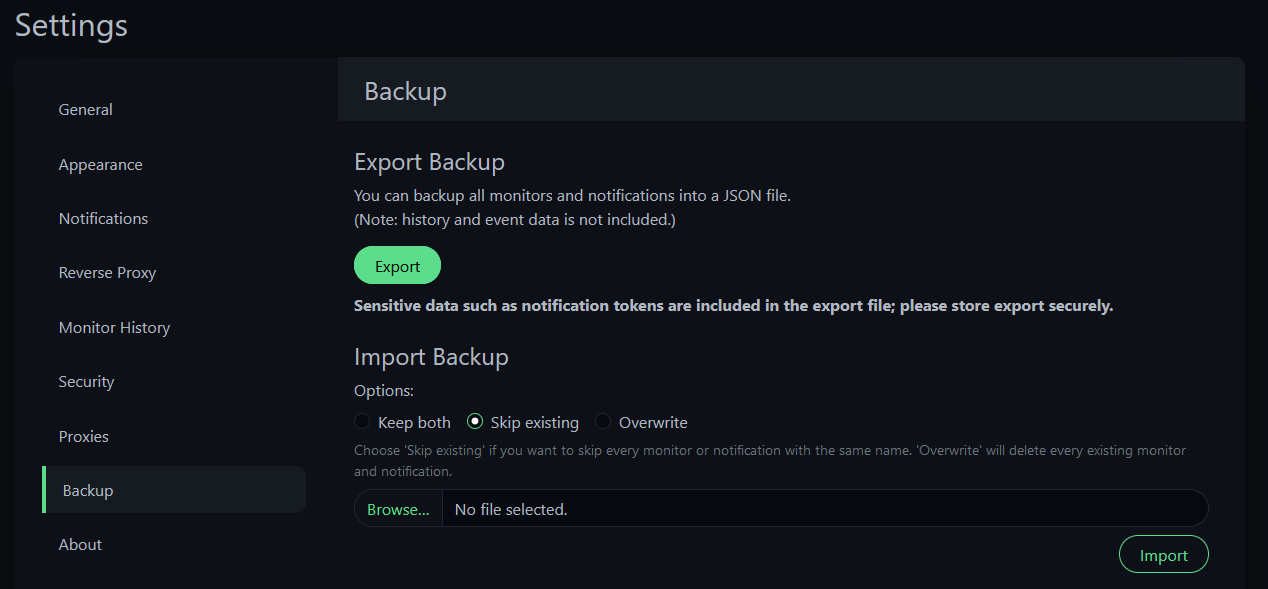
Also what makes this easy is that Uptime-Kuma has an export feature (under the Settings -> Backup tab) which lets you easily export and import your config. So all I had to do was export it on my homelab instance, import it on my VPS isntance, and boom every one of my monitors were there. It does not quite export everything like status pages or Steam API Keys but those can be easily configured.
Note about Cloudflare
During this process I found out that Cloudflare won’t proxy nested sub-domains unless you pay for their services, starting at $10/mo. I was trying to have my homelab Uptime-Kuma at status.example.com and my VPS instance at status.vps.example.com but you get a certificate error if you try to proxy your traffic through Cloudflare for the second one. For a VPS though, this is okay to not have proxied traffic and I let Traefik handle my Let’s Encrypt certificates.
Note about BuyVM.net
As I’m writing this post I went to go check on my status pages and it almost seems like BuyVM put my VM to sleep since I had not logged in nor went to my Uptime-Kuma instance. When I tried to naviage to status.vps.example.com it just hung and it wasn’t until I logged in via ssh did it load up. I’m not sure if this was an issue on my end or theirs. However in my Uptime-Kuma logs I can see ping spikes of 22000 milliseconds.
Here are ping histories of my two Github Pages websites, so not self-hosted, ensuring it is not my home network:
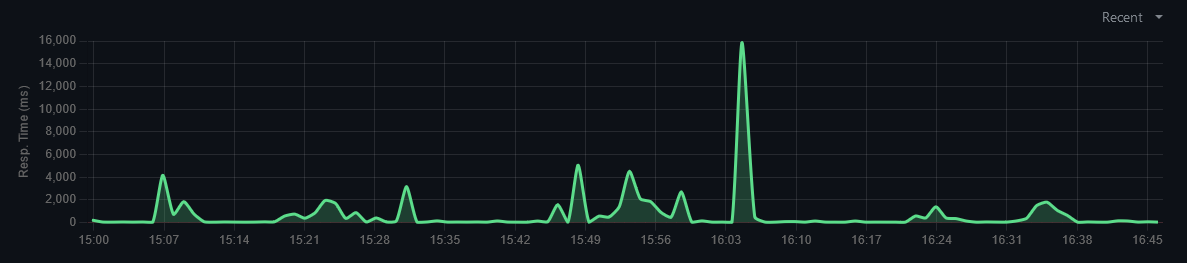
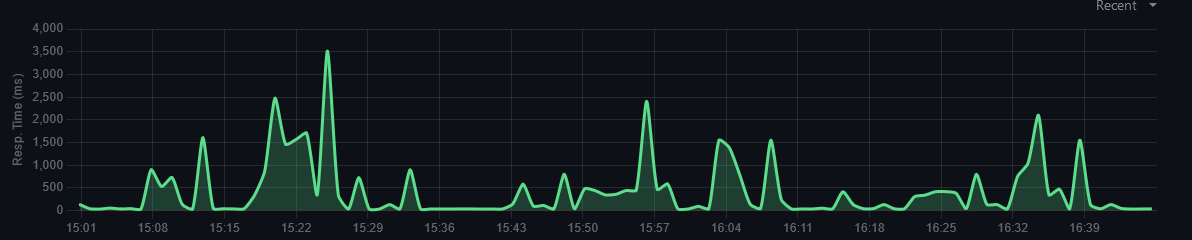
So maybe they’re not going to sleep, but they are definitely having their own network problems.